AgentScope Studio
AgentScope Studio is an open sourced Web UI toolkit for building and monitoring multi-agent applications. It provides the following features:
Dashboard: A user-friendly interface, where you can monitor your running applications, and look through the running histories.
Workstation: A powerful interface to build your multi-agent applications with Dragging & Dropping.
Server Manager: An easy-to-use monitoring and management tool for managing large-scale distributed applications.
Gallery: Coming soon!
Start AgentScope Studio
To start a studio, first ensure you have installed the latest version of AgentScope. Then, you can simply run the following Python code:
import agentscope

agentscope.studio.init()
Or you can run the following command in the terminal:
as_studio
After that, you can visit AgentScope studio at http://127.0.0.1:5000.
Of course, you can change the host and port, and link to your application running histories by providing the following arguments:
import agentscope

agentscope.studio.init(
    host="127.0.0.1",                   # The IP address of AgentScope studio
    port=5000,                          # The port number of AgentScope studio
    run_dirs = [                        # The directories of your running histories
        "xxx/xxx/runs",
        "xxx/xxx/runs"
    ]
)
About Dashboard
Dashboard is a web interface to monitor your running applications and look through the running histories.
Note
Currently, Dashboard has the following limitations, and we are working on improving it. Any feedback, contribution, or suggestion are welcome!
The running application and AgentScope Studio must be running on the same machine for URL/path consistency. If you want to visit AgentScope in the other machine, you can try to forward the port to the remote machine by running the following command in the remote machine:
# Supposing AgentScope is running on {as_host}:{as_port}, and the port
# of the remote machine is {remote_machine_port}
ssh -L {remote_machine_port}:{as_host}:{as_port} [{user_name}@]{as_host}
For distributed applications, the single-machine & multi-process mode is supported, but the multi-machine multi-process mode is not supported yet.
Register Running Application
After starting the AgentScope Studio, you can register your running applications by specifying studio_url in agentscope.init():
import agentscope

agentscope.init(
    # ...
    project="xxx",
    name="xxx",
    studio_url="http://127.0.0.1:5000"          # The URL of AgentScope Studio
)
After registering, you can view the running application in the Dashboard. To distinguish different applications, you can specify the project and name of the application.
Note: Once you register the running application, the input operation within the
agentscope.agents.UserAgentclass will be transferred to the Dashboard in AgentScope Studio, and you can enter the input in the Dashboard.
Import Running Histories
In AgentScope, the running histories are saved in the ./runs directory by default. If you want to watch these running histories in the Dashboard, you can specify the run_dirs in agentscope.studio.init():
import agentscope

agentscope.studio.init(
    run_dirs = ["xxx/runs"]
)
About Workstation
The workstation is designed to empower zero-code users. It facilitates the creation of complex applications through a user-friendly, drag-and-drop interface.
Note: We are actively developing the workstation, and the interface may continue to change. Any feedback, contribution, or suggestion are welcome!
Quick Start
In AgentScope Studio, click the workstation icon in the sidebar or welcome page to enter the workstation. The workstation is consisted of a sidebar, a central workspace and a top toolbox. Their functionalities are as follows:
Sidebar: Providing pre-built examples to help you become acquainted with the workstation, and draggable components for building applications.
Central workspace: The main area where you can drag and drop components to build your application.
Top toolbox: To import, export, check, and run your application.
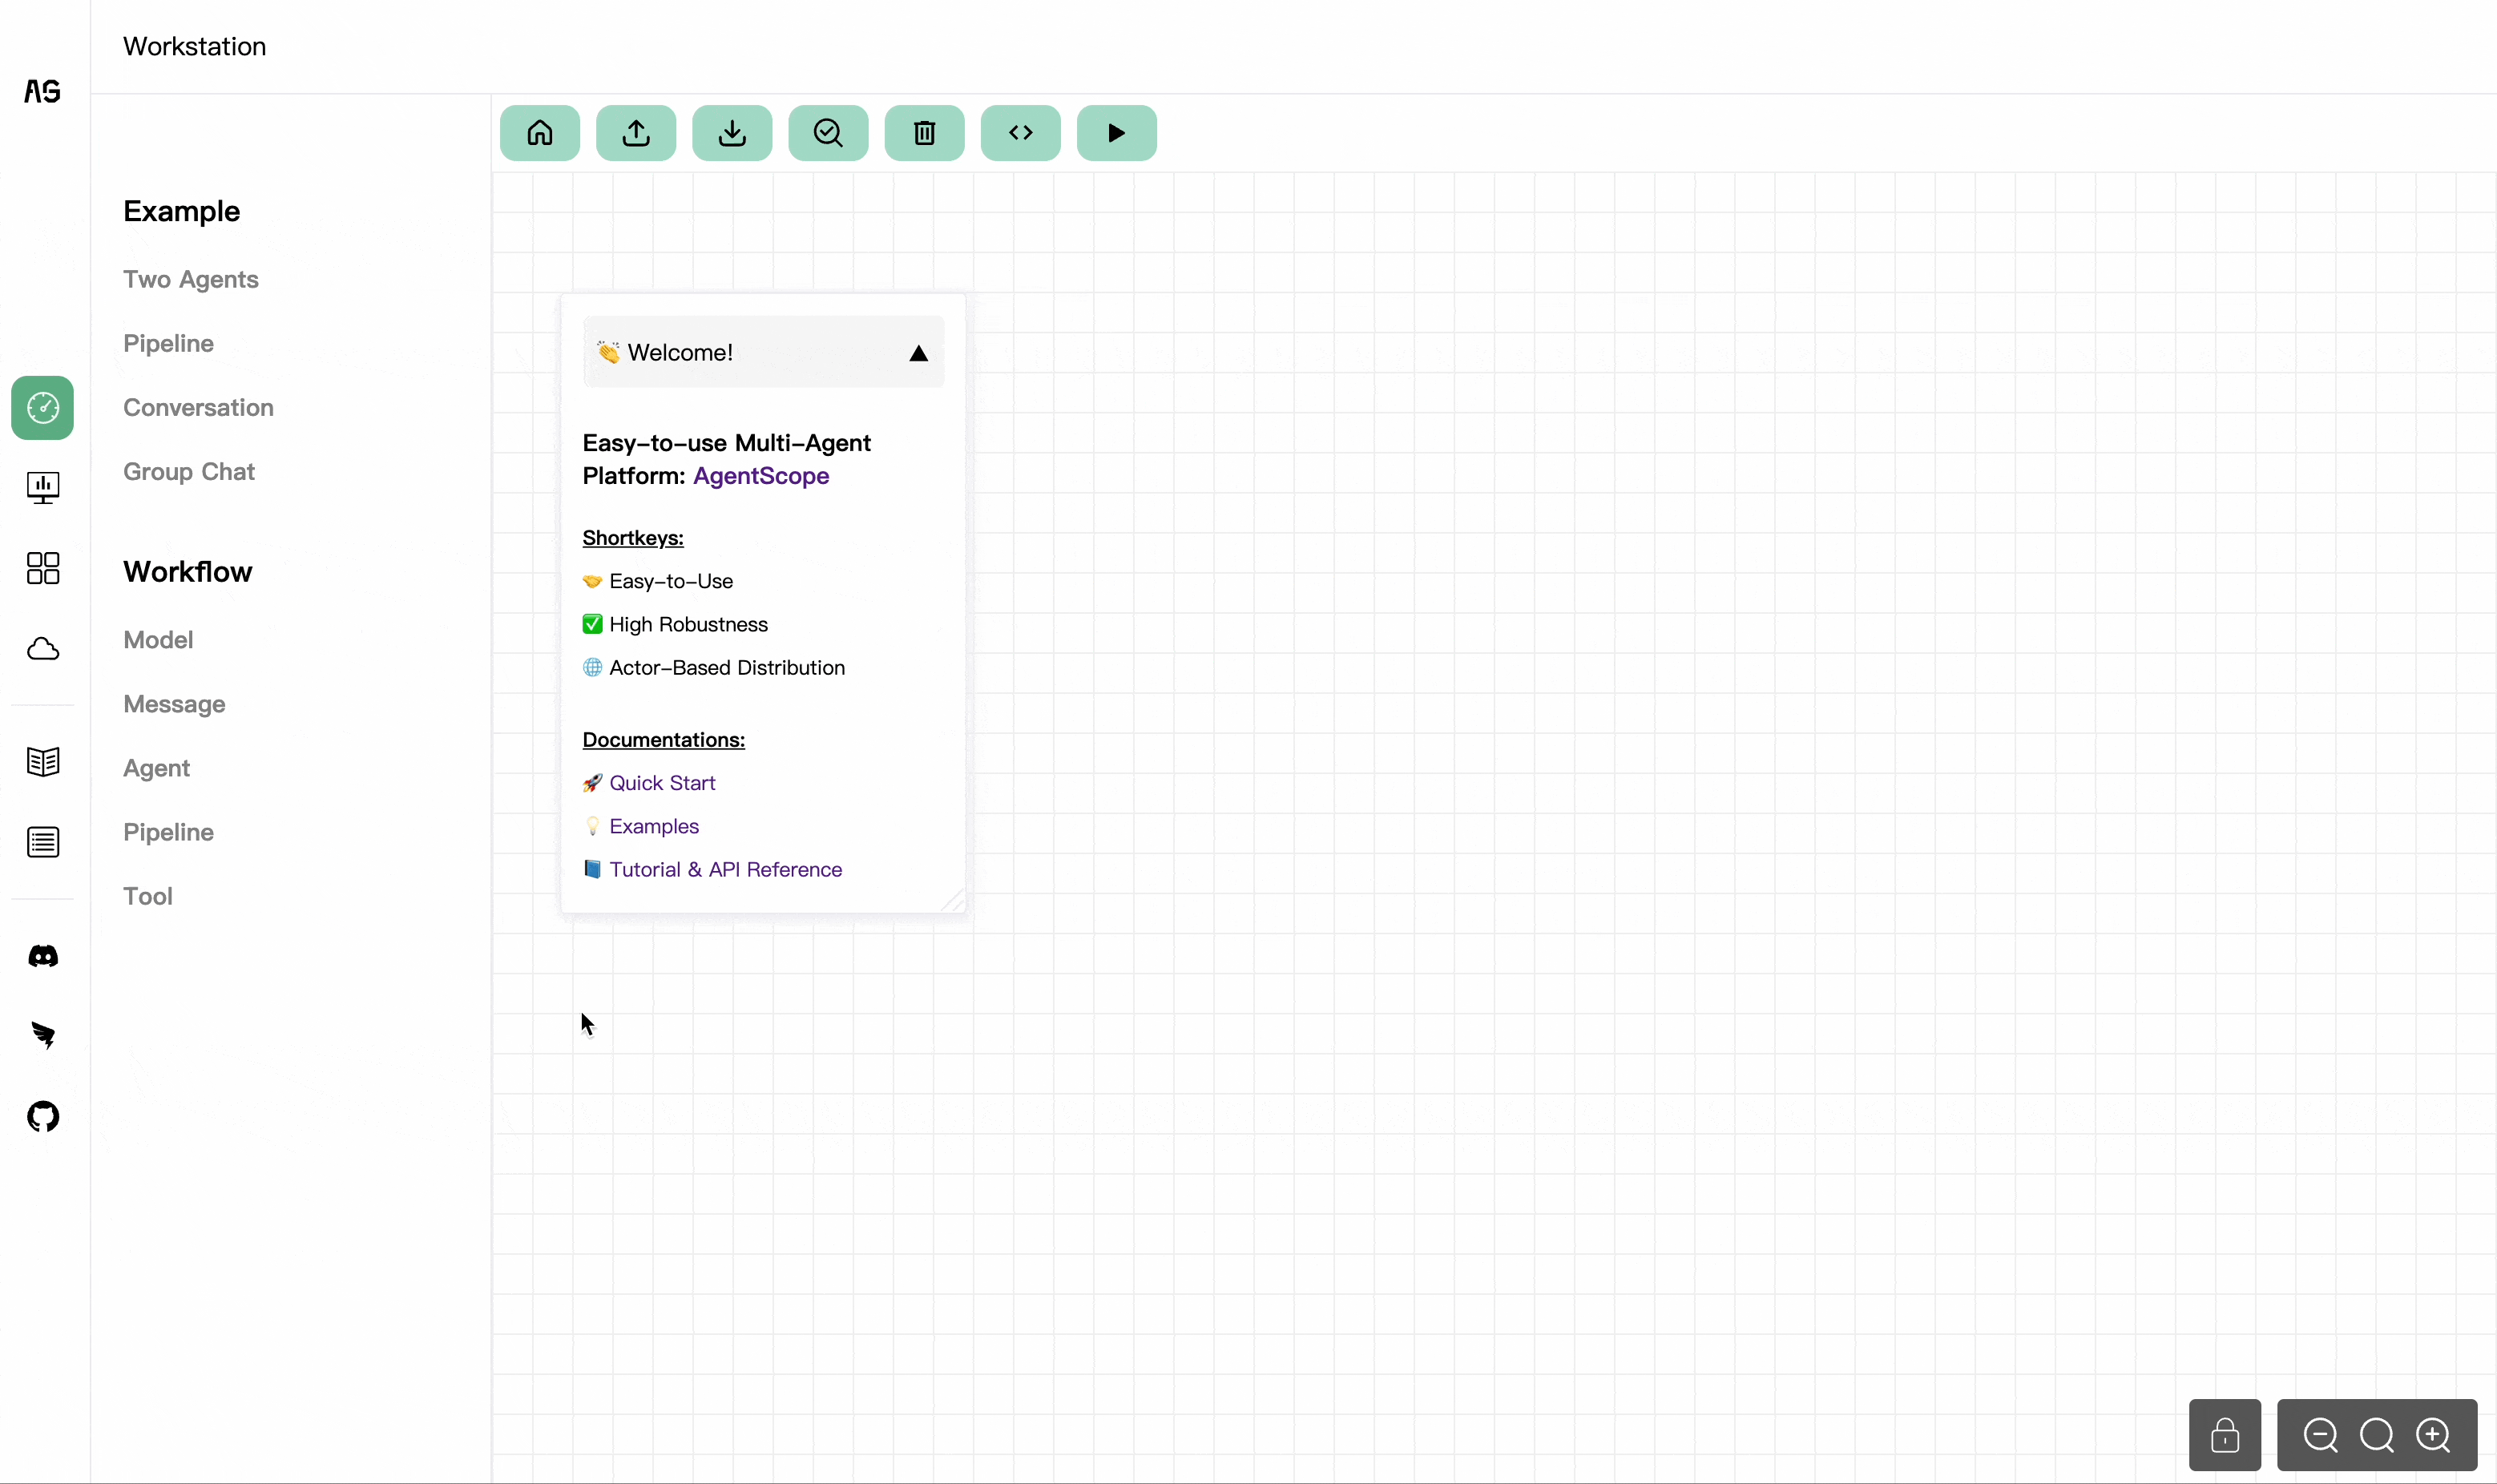
Explore Built-in Examples
For beginners, we highly recommend starting with the pre-built examples to get started. You have the option to directly click on an example to import it into your central workspace. Alternatively, for a more structured learning experience, you can opt to follow along with the tutorials linked to each example. These tutorials will walk you through how each multi-agent application is built on AgentScope Workstation step-by-step.
Build Your Application
To build an application, following these steps:
Choose & drag component: Click and drag your chosen component from sidebar into the central workspace area.
Connect nodes: Most nodes come with input and output points. Click on an output point of one component and drag it to an input point of another to create a message flow pipeline. This process allows different nodes to pass messages.
Configure nodes: After dropping your nodes into the workspace, click on any of them to fill in their configuration settings. You can customize the prompts, parameters, and other properties.
Run Your Application
Once the application is built, click on the “Run” button. Before running, the workstation will check your application for any errors. If there are any, you will be prompted to correct them before proceeding. After that, your application will be executed in the same Python environment as the AgentScope Studio, and you can find it in the Dashboard.
Import or Export Your Application
Workstation supports to import and export your application. Click the “Export HTML” or “Export Python” button to generate code that you can distribute to the community or save locally. If you want to convert the exported code to Python, you can compile the JSON configuration to Python code as follows:
# Compile
as_workflow config.json --compile ${YOUR_PYTHON_SCRIPT_NAME}.py
Want to edit your application further? Simply click the “Import HTML” button to upload your previously exported HTML code back into the AgentScope Workstation.
Check Your Application
After building your application, you can click the “Check” button to verify the correctness of your application structure. The following checking rules will be performed:
Presence of Model and Agent: Every application must include at least one model node and one agent node.
Single Connection Policy: A component should not have more than one connection for each input.
Mandatory Fields Validation: All required input fields must be populated to ensure that each node has the necessary args to operate correctly.
Consistent Configuration Naming: The ‘Model config name’ used by Agent nodes must correspond to a ‘Config Name’ defined in a Model node.
Proper Node Nesting: Nodes like ReActAgent should only contain the tool nodes. Similarly, Pipeline nodes like IfElsePipeline should contain the correct number of elements (no more than 2), and ForLoopPipeline, WhileLoopPipeline, and MsgHub should follow the one-element-only rule (must be a SequentialPipeline as a child node).
About Server Manager
AgentScope Distribution is required for understanding the content of this section.
Server Manager is a web interface used to monitor and manage agent server processes (Servers) and large-scale distributed multi-agent applications.
Registering Server Process
The process can be registered by passing the studio_url parameter when initializing RpcAgentServerLauncher.
# import some packages
server = RpcAgentServerLauncher(
    # ...
    studio_url="http://studio_ip:studio_port",  # connect to AgentScope Studio
)
For more specific registration methods, please refer to the Connecting to AgentScope Studio section in Distribution.
Managing Server Process
You can enter the Server Manager page from the AgentScope Studio home page or via the Server Manager button on the sidebar. The current Server Manager page consists of three parts: Servers list, Agents list, and Memory list.
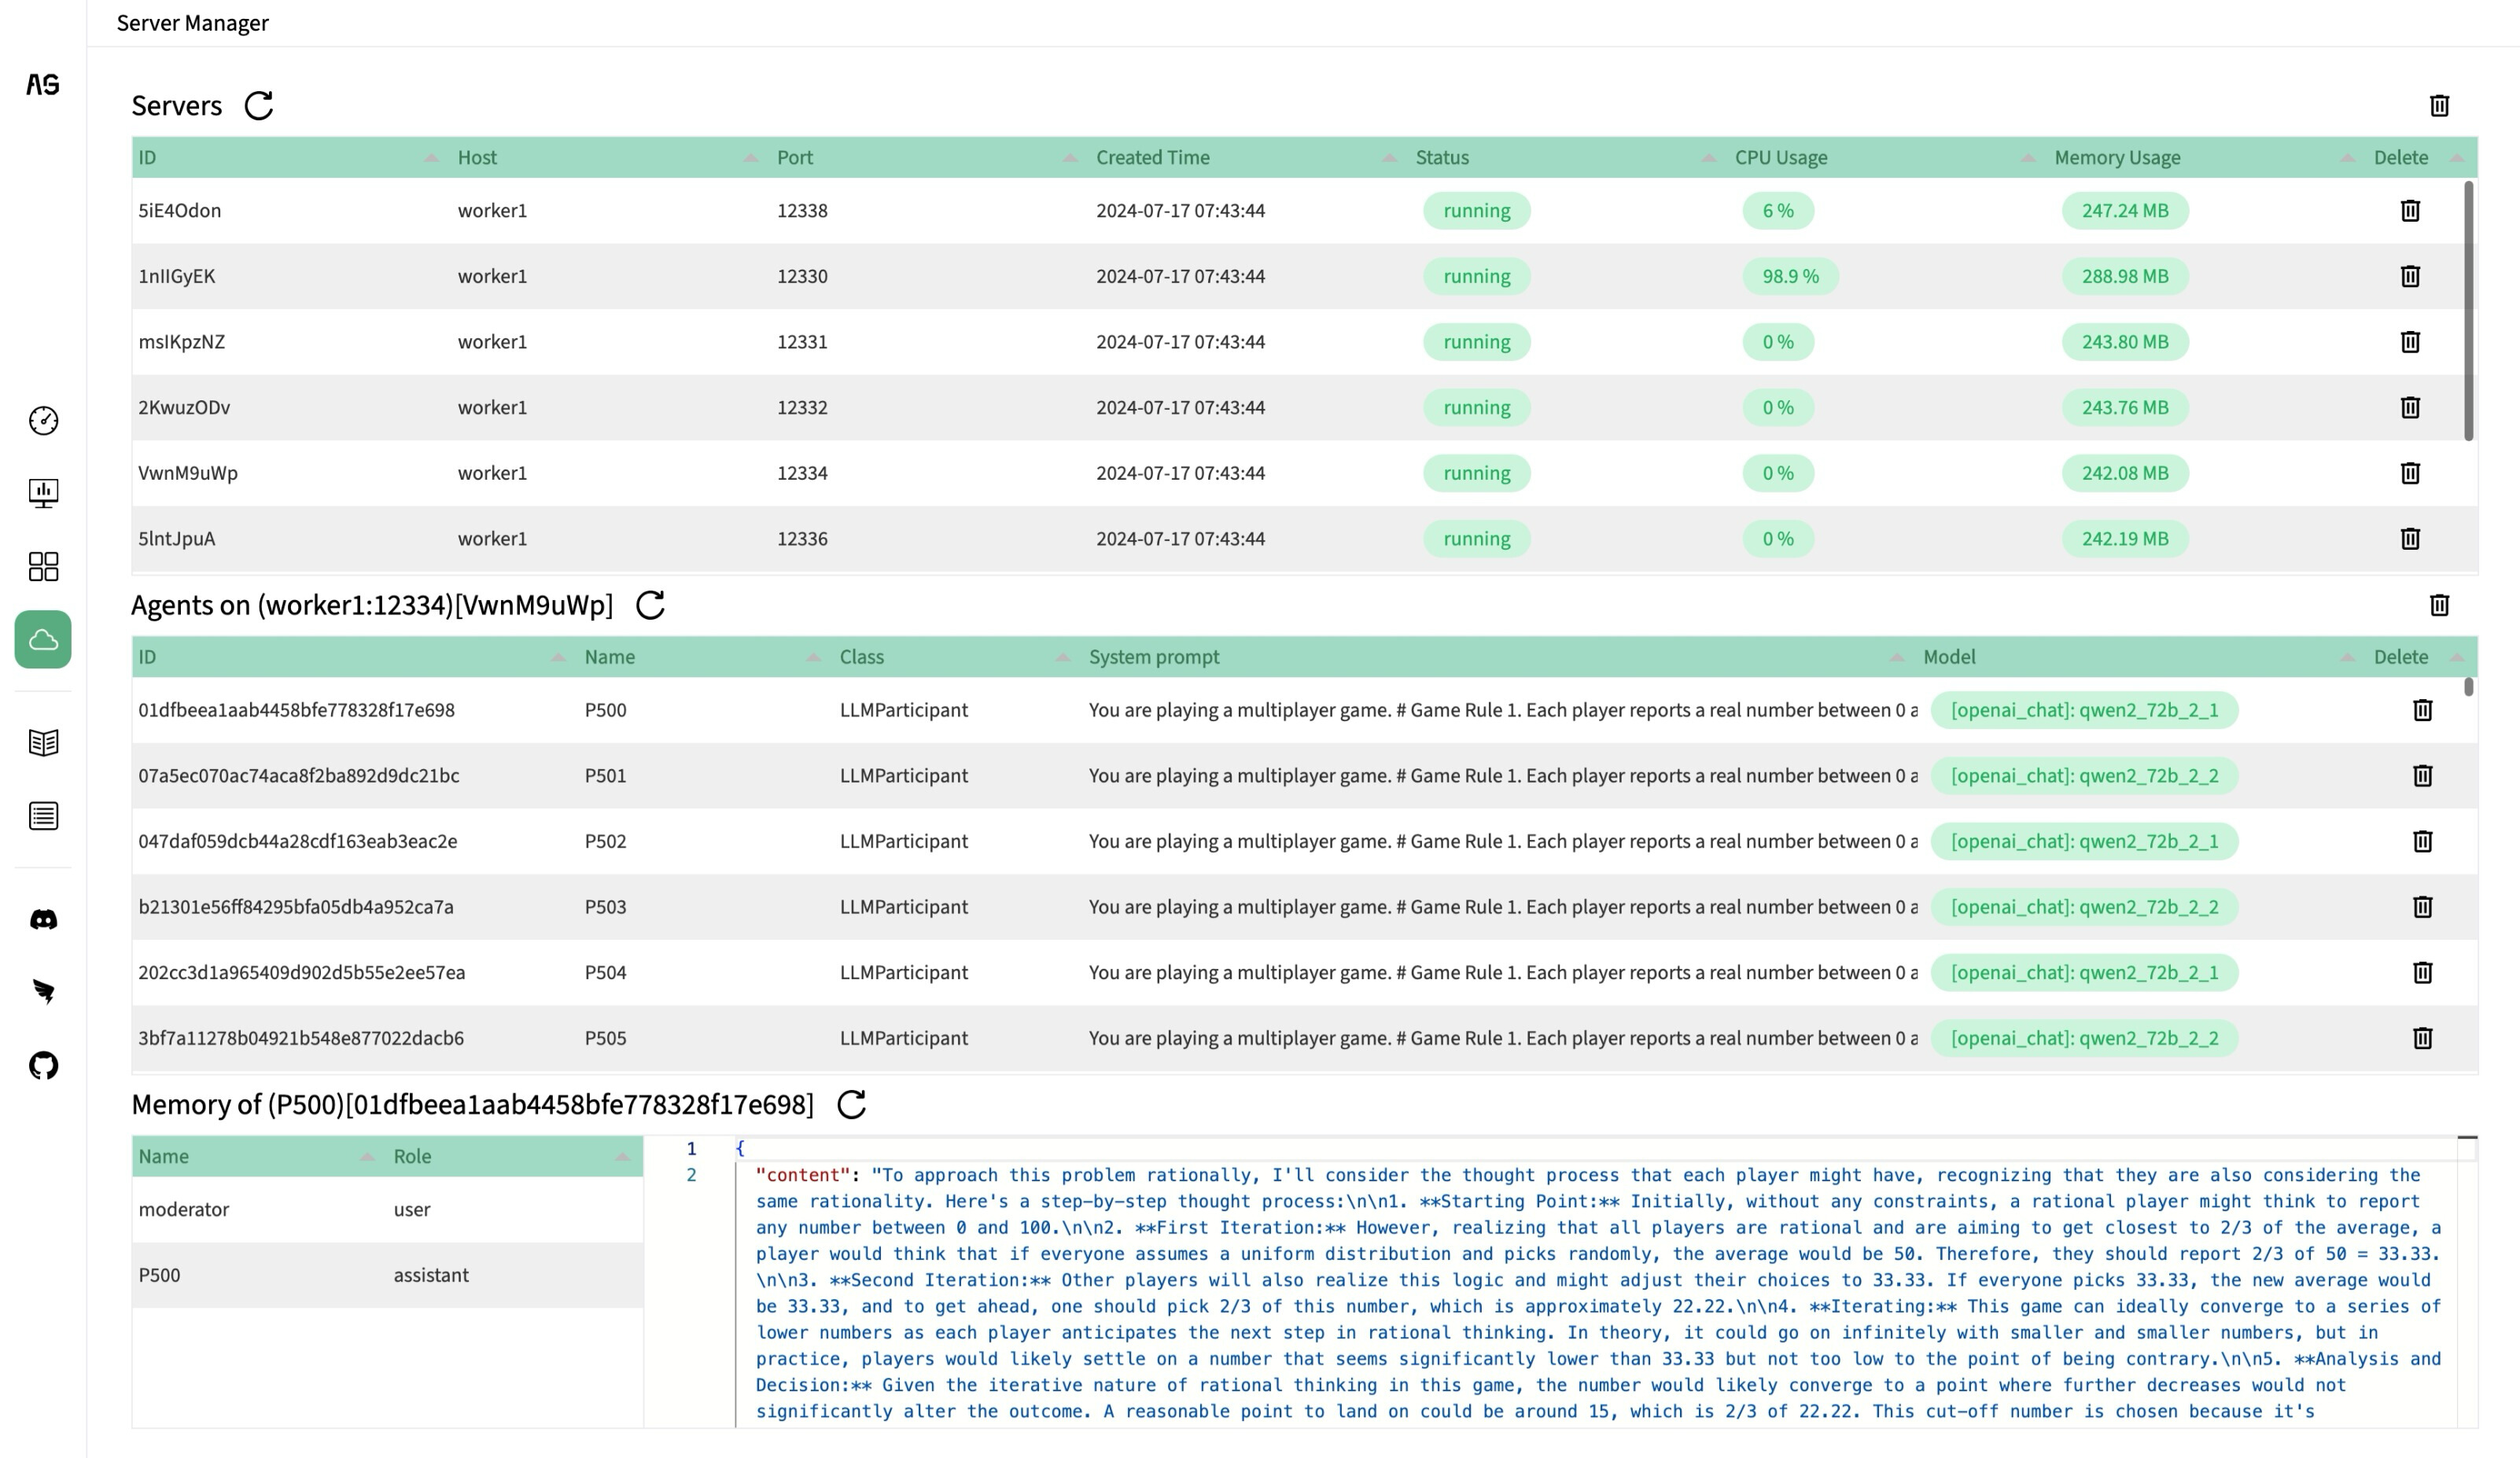
Servers List
The AgentScope agent server processes (Servers) registered with the Studio will be displayed on the Servers list in the Server Manager page. The list will display not only the ID, Hostname, Port, and Created Time of each Server but also the status and computational resource usage of each Server, including Status, CPU Usage, Memory Usage.
The Status includes the following types:
- running: Indicates that the Server is running.
- dead: Indicates that the Server has stopped running.
- unknown: Indicates that the Studio service cannot currently be accessed normally.
Only Servers in running status will display CPU and memory usage. Users can refresh the Servers list by clicking the refresh button on the left of the Servers bar, and all Servers in dead status can be deleted at once by clicking the delete button on the right of the Servers bar.
The last column of each row in the Servers list provides a delete button for closing and deleting the Server. Please note that this operation is irreversible and should be used with caution.
Agents List
By clicking on any Server row with running status, the Agents list will expand in the page, displaying all Agents under that Server. The list will display the ID, Name, Class, System Prompt, and Model of each Agent.
The Agents list can also be refreshed by the user clicking the refresh button on the left of the Agents bar. Each Agent can be deleted by clicking the delete button on the rightmost side of its row, and all Agents within a Server can be deleted in bulk using the delete button on the right side of the Agents bar. As with the deletion of Servers, these operations are irreversible and should be used cautiously.
Memory List
By clicking on any Agent row, the Memory list will expand on the page, displaying all messages within the Agent’s memory. Each message will display its Name and Role attributes on the left, and clicking on a message will display its content on the right side of the list.
Similarly, the current Memory list can be refreshed by clicking the refresh button on the left of the Memory bar.